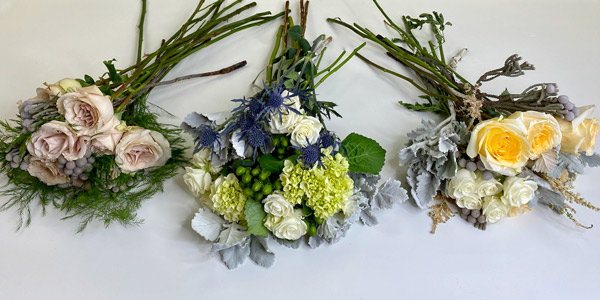
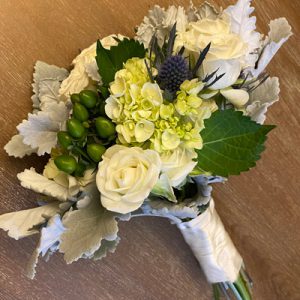
Are you looking for something different and creative for your DIY bridesmaid’s flower bouquets? You don’t have to make all the bouquets matching each other. Make each flower bouquet unique, mixing, and coordinating colors to each bridesmaid’s dress and personality. I can assure you that you will cut costs by DIY’ing your wedding flowers and have fun creating gorgeous bouquets with memories of a lifetime. Below is a step-by-step on How-To DIY bridesmaid’s flower bouquets.
We have created three bridesmaid’s bouquets using our favorite winter greens that coordinate together in color and flowers but have a unique personality for each. Use each step as an outline choosing your favorite flowers and colors, making magic happen!
Supplies you will need:
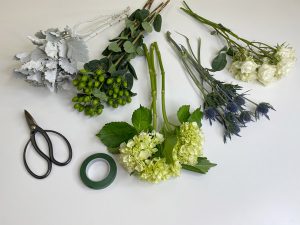
2 stems of Mini Green Hydrangeas
3 stems of White Spray Roses
1-2 stems of Green Hypericum
1-2 stems of Thistle
3 stems of Dusty Miller
Floral Tape
Floral Scissors
Ribbon
Forming The Flower Bouquet

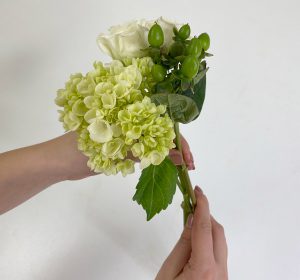
To save time, prepare your flowers before making your bouquet. Remove all leaves from the stem. Start with your focal flower, which is our mini green hydrangea next; add the spray roses with the stem on an angle facing towards the left like this, but keep the roses at the same height as much as possible with your focal flower. Repeat this by adding your hypericum, thistle, and dusty miller.
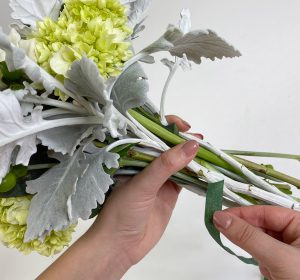
Cutting Flower Stems

Taping The Flower Bouquet
Every time you add a flower, rotate the bouquet, add the next flower diagonally, angled leftward as before. Use your hand to hold the stems tightly while trimming the ends. Keep holding the stems tightly together.
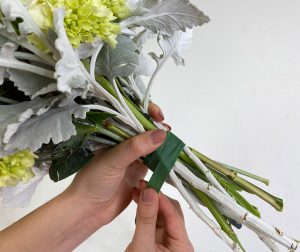
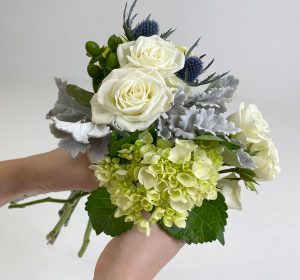
Wrap floral tape starting at the top of the blooms downward to keep all of your flowers held together. This will ensure that the flowers are firmly held in place. Don’t wrap all the way to the bottom of the stems. Wrap down the stems approximately 2-3 inches. You will cover the floral tape with the ribbon. You can finally let go of your bouquet!
Wrapping The Ribbon
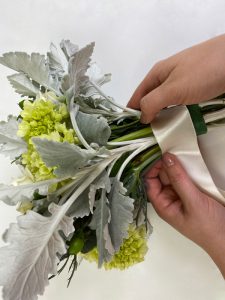

Adding the ribbon is the last step to ensure that your bouquet looks gorgeous. The ribbon may be shiny on one side and matte on the other. First, place the ribbon’s matte side facing the stems so that the shiny side is visible. Then put one end over the top of your flowers and wrap the rest around the stems. Voila!!! You did it! Just keep the bouquet in water until the special day.
Below are the other recipes for the matching bouquets. Make these bouquets for any special event.

4-5 stems of Rose Creme De La Creme
1-2 stems of White Spray Roses
4-5 stems of Silver Brunia
4 stems of Pink Astilbe
3-4 stems of Dusty Miller

7-10 stems of Quicksand
3-4 stems of Silver Brunia
4-5 stems of Tree Fern
Want to learn more about How-To DIY flowers? We offer many tutorials and videos to make it easy for you.
Read more… Create a beautiful tall centerpiece for your wedding or next dinner party!
Tina Merola
As a professional designer with over twenty years of industry experience, Tina's lifelong creative passion has enabled her to pursue her artistry and vision in various professional environments. Drawing on her knowledge from floral techniques and tips from the industry’s leading professionals allows her the opportunity to channel her love of the unique beauty of nature’s many wondrous blooms into stunning floral designs.